Thank you for purchasing the FirstFiber Technologies MK1000 OTDR module.
Overview
The factory default IP address of the MK1000 module is 192.168.111.249. To use this device within your existing Local Area Network (LAN) and avoid IP conflicts, you must add a new network segment (192.168.111.x) to your computer’s network adapter settings.
Hardware Connection & Getting Network Info
Step 1. Connect the OTDR module to a LAN port on your router using an Ethernet cable.
Step 2. On your computer, open a PowerShell window (or Command Prompt).
Step 3. Type the command ipconfig and press Enter to view your current network information.
Windows PowerShell
Copyright (C) Microsoft Corporation. All rights reserved.

PS C:\Users\Admin> ipconfig

Windows IP Configuration

Ethernet adapter Ethernet:

   Connection-specific DNS Suffix  . :
   Link-local IPv6 Address . . . . . : fe80::d83b:8a3c:25ba:7342%15
   IPv4 Address. . . . . . . . . . . : 192.168.1.55    <-- (Record this IP)
   Subnet Mask . . . . . . . . . . . : 255.255.255.0   <-- (Record this Mask)
   Default Gateway . . . . . . . . . : 192.168.1.1     <-- (Record this Gateway)
Important: Please write down your specific IPv4 Address, Subnet Mask, and Default Gateway from the output. You will need to enter these exact numbers in Step 8 to ensure your computer stays connected to the Internet.
Configuring the Network Adapter
Step 4. In the same PowerShell window, type ncpa.cpl and press Enter to open the Network Connections window.
Step 5. Right-click your active network adapter (e.g., Ethernet or Wi-Fi) and select Properties.
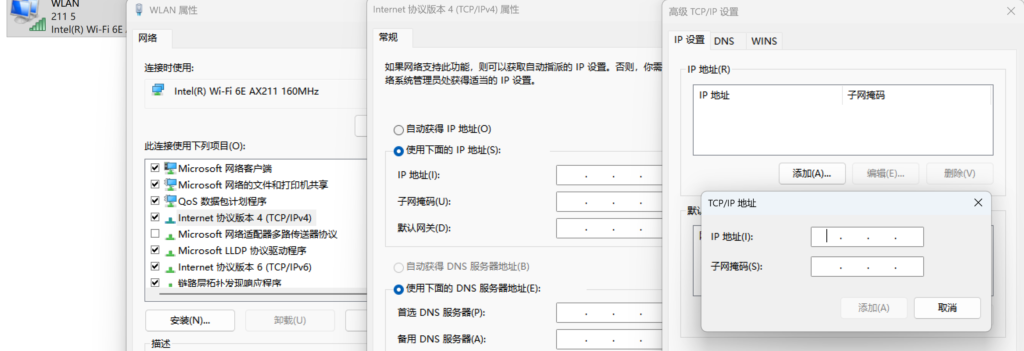
Step 6. In the Properties window, scroll down to find Internet Protocol Version 4 (TCP/IPv4), and double-click it to open its properties.
Step 7. Select the “Use the following IP address” option.
Step 8. Enter the network configuration you recorded in Step 3:
- Enter your original IP address, Subnet mask, and Default gateway into their respective fields.
- For the Preferred DNS server field below, simply enter the same address as your Default gateway.
Adding the OTDR Network Segment
Step 9. Click the Advanced… button at the bottom of the window.
Step 10. In the pop-up Advanced TCP/IP Settings window, locate the “IP addresses” section and click Add…
Step 11. Enter a new IP address that is in the same network segment as the OTDR module, but different from the module itself.
- IP address: 192.168.111.100 (Recommended)
- Subnet mask: 255.255.255.0
Step 12. Click Add, and then click OK on all open windows to save and apply the settings.
Verifying the Connection
Step 13. Return to the PowerShell window to test the communication. Type the following command and press Enter.
PS C:\Users\Admin> ping 192.168.111.249

Pinging 192.168.111.249 with 32 bytes of data:
Reply from 192.168.111.249: bytes=32 time<1ms TTL=64   <-- (Success)
Reply from 192.168.111.249: bytes=32 time<1ms TTL=64
How to read the result:
- Success: If you see replies such as
"Reply from 192.168.111.249: bytes=32 time<1ms...", the configuration is correct and the module is successfully connected. - Failure: If you see
"Request timed out"or"Destination host unreachable", please double-check your IP configuration in Step 11.